
In this video, we’re going to explore how to teach piano lessons online. I’ve been teaching piano lessons online since 2009 when I created my YouTube series, Clair de Lune From Scratch, and since 2014 I’ve been teaching students all around the world through my Online Popular Piano School at Artist Works. In this video, we’re going to explore three basic ways for piano teachers to teach live one-on-one lessons over the internet. They’re going to vary in terms of the quality of the video and of the sound, as well as some of the capabilities of what you can teach and show through these streaming lessons. We’ll also touch a little bit on what’s going to be needed in terms of equipment for the students to receive those lessons.
Basic Principles
For an effective online piano lesson, the teacher and the students need to be able to see and hear each other clearly. The teacher needs to be able to play and show examples on the piano and the teacher needs to be able to see and hear what the student is doing in response. And in a more advanced setting, the teacher will be able to show multiple angles, not just from the side, but ideally also from above, and also perhaps show examples from the music itself, particularly if they want to write in fingerings, annotate notes, or make any other kinds of graphical markings on the music just like you would with pencil on the sheet music paper for a student but of course transmitted over the internet. So we’re going to explore all of those options beginning with the most basic form where you at least see and hear each other.

Level 1: Basic Online Piano Lesson
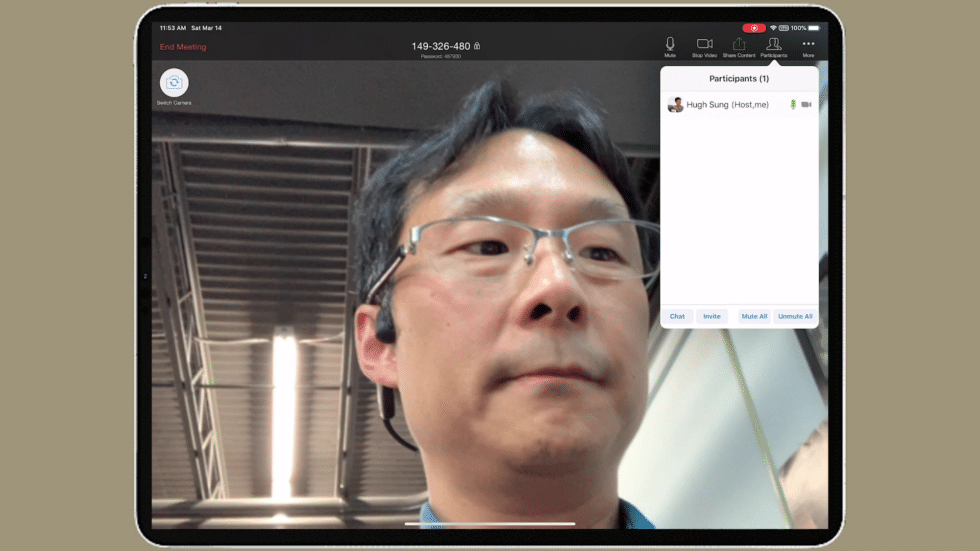
For the most basic online piano lesson, both the teacher and the student will need some sort of device to capture video and audio, connect to the internet, and use a video conferencing program. Some popular video conferencing programs in the past have been things like FaceTime or Skype, but the program I actually recommend now is something called Zoom. Zoom is currently the most popular web conferencing program for many good reasons. The quality of the audio streaming is excellent. It has some wonderful features for recording and even transcribing the lessons. So I highly recommend you check out Zoom.us, which works across all platforms (Mac, Windows, iOS, and Android). Once you’ve downloaded and installed Zoom on your device, you’ll be prompted to create a free account (with a paid subscription, you’ll have access to additional features). To start an online piano lesson using Zoom, open the app, sign in, and then tap on “New Meeting”. For this example, I’m using an iPad.

In the next screen, make sure “Video On” is on, and then tap on “Start a Meeting”.

In the next screen, select “Call using Internet Audio”.

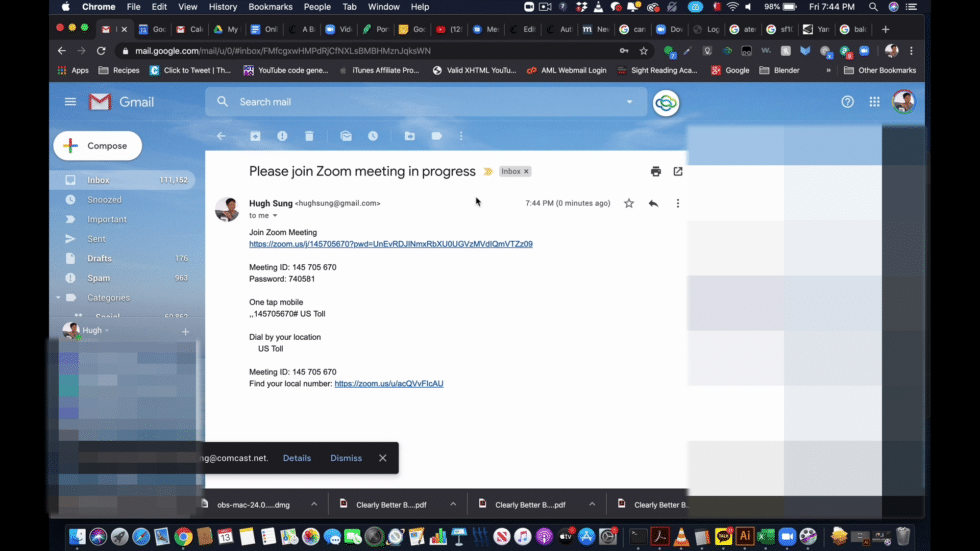
To connect with a student, tap on “Participants” in the top menu bar, then tap on “Invite”. You’ll be given options to send a meeting link in a variety of ways, including email.

If an invitation is sent by email, the recipient will receive a link to go directly to the Zoom meeting. They will be prompted to download and install Zoom if they haven’t done so already.
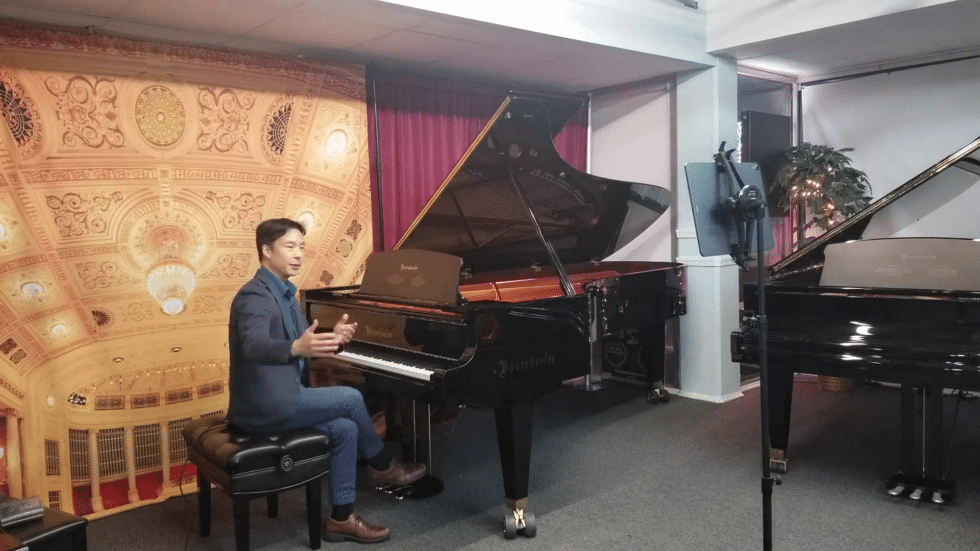
When using a laptop for an online piano lesson, I recommend that you have it positioned about three or four feet away from the piano and elevated. This is the really important point. I have this elevated so that I can get a full cross-view of the piano from the bottom to the top so that when my hands are together I can still see the individual fingers on the notes. If your camera source is too low, it’s going to be hard to distinguish where those hands and fingers are relative to the keys. So this kind of positioning is really, really good for both the teacher and for the student view. You can use a small book shelf or a high table if you have something that high. In my case, I actually have an inStand laptop tripod, a laptop stand, that can adjust in height. This is an ideal tool for using a laptop’s webcam.

So one of the limitations of course is that I only have one view, it’s just that single camera view and you’ll have to explain and talk through everything else. There’s no view of my pedals, and there’s no view of the sheet music. For an iPad setup, I recommend using a tablet mount like the Manos Mount made by AirTurn, attached to a mic stand. This will enable you to place the iPad at a height and angle that will allow for a full view of the keyboard and pianist posture.

Now, a really important consideration why I’m using iPads and laptops and not a smartphone is simply for the fact that I need to be able to see the student and the student needs to be able to see me, not just over the internet, but also as we’re doing the lesson. This iPad pro screen is large enough so that even though it’s a little bit further away I can still see the hands on the keys and if the screen is large enough, the student can see me in return. If you’re using a smartphone and using the selfie camera on a smartphone, the screen is just too small because you’re going to have to have it far enough away to see the whole keyboard, so on and so forth. Again, it’s that real time interaction that we need to maintain for an effective lesson.
Level 2: Basic Multi-Camera Online Piano Lesson
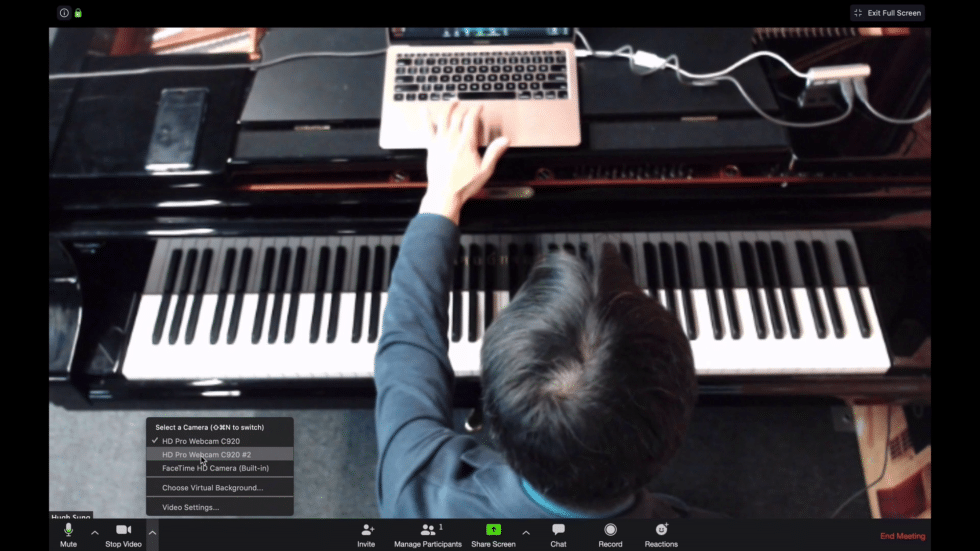
Now let’s explore some more advanced ways for the teacher to enhance the quality of their video and their audio for the lesson. Now, for very basic online piano lessons, using a laptop or an iPad is perfectly acceptable. Keep in mind you’re limited to a single point of view and the audio quality is going to be dependent on the internal microphones of these devices. They’re not designed to record high quality musical examples. Now you can improve sound quality somewhat by adding a USB microphone to a laptop, and I believe the iPad also has external microphone attachment options as well. Personally, I find that a multi-camera setup is much more effective for online piano lessons. A side angle like this so that you can look at posture issues, you can do some basic fingering things, but I find that an overhead cam is much more effective at explaining how to finger the different notes and passages and you can see your technique in a whole new and actually a personal way. So I highly recommend exploring multi-camera lesson setups whenever possible. In this next example, I’m going to show you how to set up a very basic multi-camera online piano lesson. I have one HD webcam mounted on a standard tripod for my side keyboard view, and another HD webcam on a microphone boom stand with an On Stage CM01 Video Camera/Digital Recorder Adapter that allows me to add devices with standard camera mounts.

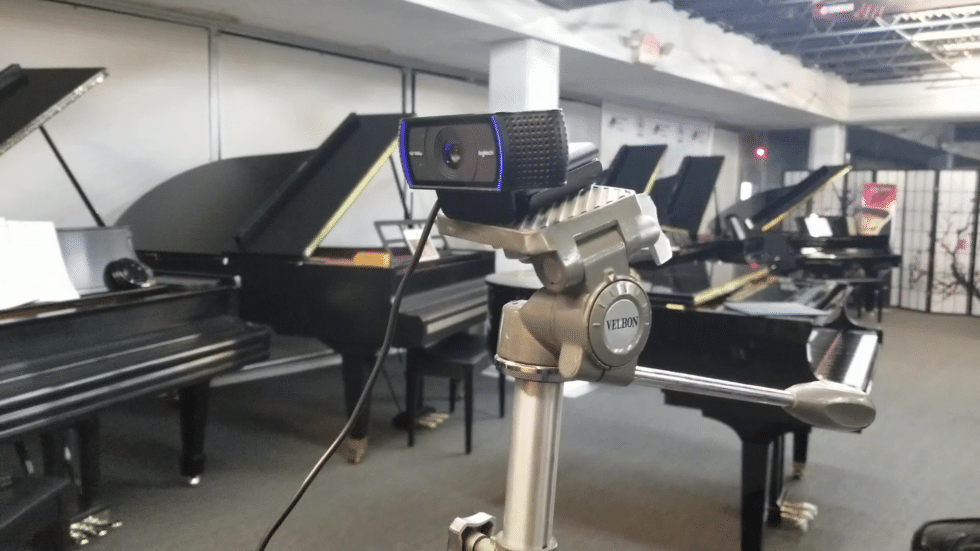
Both of these webcams connect to my computer’s USB ports. By going down to the bottom of the Zoom menu and then clicking here, I can select the different cameras that are connected to the computer for a basic multi-camera setup.

One of the nice things about this particular setup is the fact that the computer screen is right here so when I’m looking at my student, my student will see the different views but I will see the student right here. So it’s a little bit closer view for me to observe what the student is doing. It makes it easier for me to observe instead of having the laptop further away from me. Having it right in front of me makes it a little bit easier to interact. To improve the sound quality, you can add a USB microphone, like the Audio-Technica AT2020USB+. I use a USB port extender to give me enough ports for all my webcams and microphone.


Fixing Zoom’s Default Mirror View
Now you probably noticed that my image was flipped horizontally. By default, Zoom has all the image settings to be mirrored, which is okay for a face to face meeting, but if you’re trying to show fingerings and your hands are all backwards or later on in the more advanced settings when you’re trying to actually show sheet music and all the notes are reversed, that certainly is not going to work for an online piano lesson. So let’s take a quick look at one additional setting within Zoom to turn off the mirror feature. So within the zoom Application, scroll down until you see this bottom menu bar appear and click on this little arrow, which will give you the option to go into the video settings. Click on this and look at the my video settings.

You should see “Mirror my video”. Click on this to uncheck that box. And now the video should be showing with the proper perspective.

Level 3: Advance Online Piano Lesson Setup
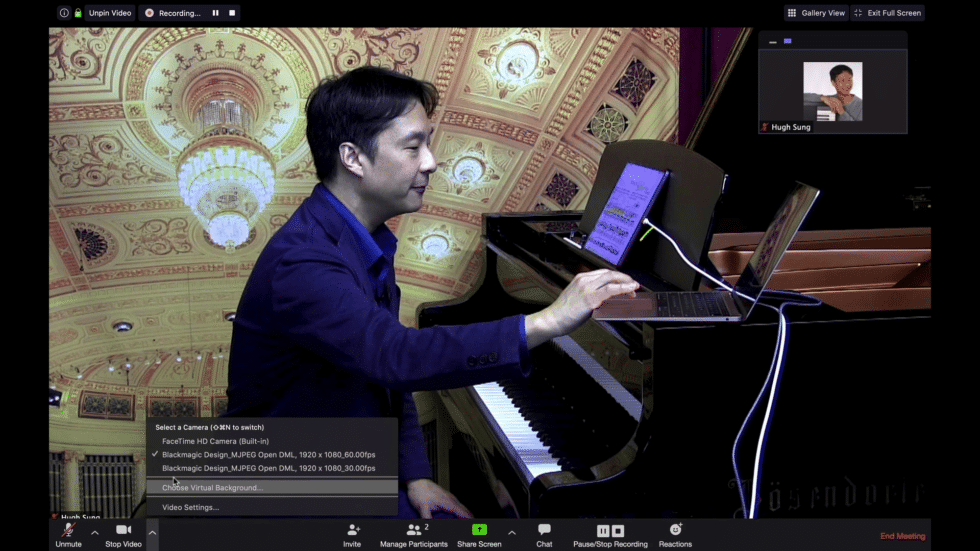
In both of these previous examples, we saw that there were real limitations in terms of the quality of the video and the audio, although it did improve significantly when we added an external USB microphone. What if there was a way to have really high quality multi-camera video including maybe an extra camera for our feet to show pedaling and maybe even a view of the sheet music so that our students could see the annotations on the music as well as high quality audio that’s miked more specifically for the piano and a separate microphone so that the student can hear the teacher speaking more clearly? In this final example, I’m going to show you what I think is the ultimate setup for an online piano lesson. And now let’s look at a system that combines multiple high quality video cameras with high quality audio for an online piano lesson streamed live. Here is a screen capture within Zoom of a side view using a high quality camera:

Here is an overhead view using an Akaso Brave 4 4K sport camera (similiar to a GoPro, but cheaper):

I can even show the pedaling with a dedicated pedal camera:

And I can show my sheet music from my iPad running a sheet music reader app called Newzik:


At the heart of this setup is a streaming video switcher called an ATEM Mini made by Blackmagic Design. This device allows me to combine video sources, up to four video sources, through HDMI cables.

The audio is a combination of sources from a lapel microphone and 2 DPA 4099 piano microphones sent to a mixing board, which is then sent to one of the video cameras that has XLR audio input ports.


Connecting the audio to one of the cameras instead of the ATEM Mini prevents having the video and audio broadcast out of sync with each other. By isolating the sound sources with separate microphones, this helps to eliminate background room echo and improve the overall quality of the voice and piano sound, for a much clearer lesson experience for the student. What makes the ATEM Mini so brilliant is the fact that you can easily switch between camera views with just a button press, and all the video and audio inputs are connected to Zoom as a single webcam device, allowing for high quality broadcast level piano lesson streams.
You don’t have to get expensive cameras and microphones like I have, but the ATEM Mini gives you the flexibility to create a multi-camera multi-microphone setup that fits your budget. The additional views – especially of the digital sheet music – will make for a much more effective online teaching and learning experience.
Links
- Hugh’s Clair de lune from Scratch YouTube lesson series: https://www.youtube.com/watch?v=QczTcXvEC7o&list=PL23BA4D8592904FB0
- Hugh’s Online Popular Piano School at ArtistWorks: https://artistworks.com/piano-lessons-hugh-sung
Equipment:
- Zoom Video Conferencing software: https://zoom.us/
- inStand Laptop tripod: https://amzn.to/33lXKtg
- Manos Mount universal tablet holder: https://amzn.to/2U8vUwn
- Logitech C920S HD webcam: https://amzn.to/2Qgsoii
- On Stage CM01 video camera mount for mic stands: https://amzn.to/2U60Nlb
- 10′ USB extension cable: https://amzn.to/2IRdNWG
- Audio-Technica AT2020USB+ microphone: https://amzn.to/2QlkrIS
- Blackmagic Design ATEM Mini HDMI Video Switcher: https://www.bhphotovideo.com/c/product/1507214-REG/blackmagic_design_swatemmini_atem_mini_switcher_control.html/?ap=y&ap=y&smp=y&smp=y&lsft=BI%3A514&gclid=Cj0KCQjwpLfzBRCRARIsAHuj6qWhvnEmYaB8ScQSwQsJ_koIMRLp1J6PygggsJGc-xUIbcdSnNThMp8aAtk9EALw_wcB
- DPA 4099 Piano Microphone: https://amzn.to/2QjTlld
- DPA 4061 Lavalier microphone: https://amzn.to/2U6uMJO
- Zoom LiveTrak L-12 Digital Mixer: https://amzn.to/33jbN2R
- Akaso Brave 4 4k Action Camera: https://amzn.to/3d2crpO
- 25′ Mini HDMI to HDMI cable: https://amzn.to/2WfUBK4
- 15′ USB C to HDMI cable (for iPad): https://amzn.to/2wXuFs4