
A few weeks ago, I posted a video showing 3 ways that piano teachers could teach their lessons online, from the most basic setup using just a laptop or a tablet, to an advanced multi-camera/multi-microphone studio with the ability to switch easily between hi-definition cameras and even a view of an iPad showing digital sheet music with annotations. While several folks have commented on how helpful the video was, others noted that the top level studio was way out of their budget. To address this, I wanted to share some ways that teachers could replicate the functionality of a top online studio without spending too much money on extra equipment. What we are aiming for is a multi-camera system that allows for at least a side and an overhead view of the keyboard for clear views of posture and fingering. This system should also strive to have the best quality audio within a feasible budget, and if possible, also share views of the sheet music and possibly other music-related graphics.
Aside from physical equipment, the most important adjustments to the audio quality will first need to be made within the video conferencing software. By default, these apps are designed for spoken voice interactions – as such, they listen for changes in volume and adjust accordingly. When you are speaking, the microphone will raise its sensitivity. When you are silent, the microphone will quickly drop its volume, in an attempt to cut out any background noise. There are other measures the apps will take, including reducing environmental echoes, blocking low level noise below a certain frequency/volume level, etc. While these measures may make talking sound great, they can be horrible for listening to music, as the app will be constantly adjusting the mic up and down, resulting in clipped audio (especially with quiet passages) and distorted dynamics.
Adjusting Zoom for Original Audio Settings
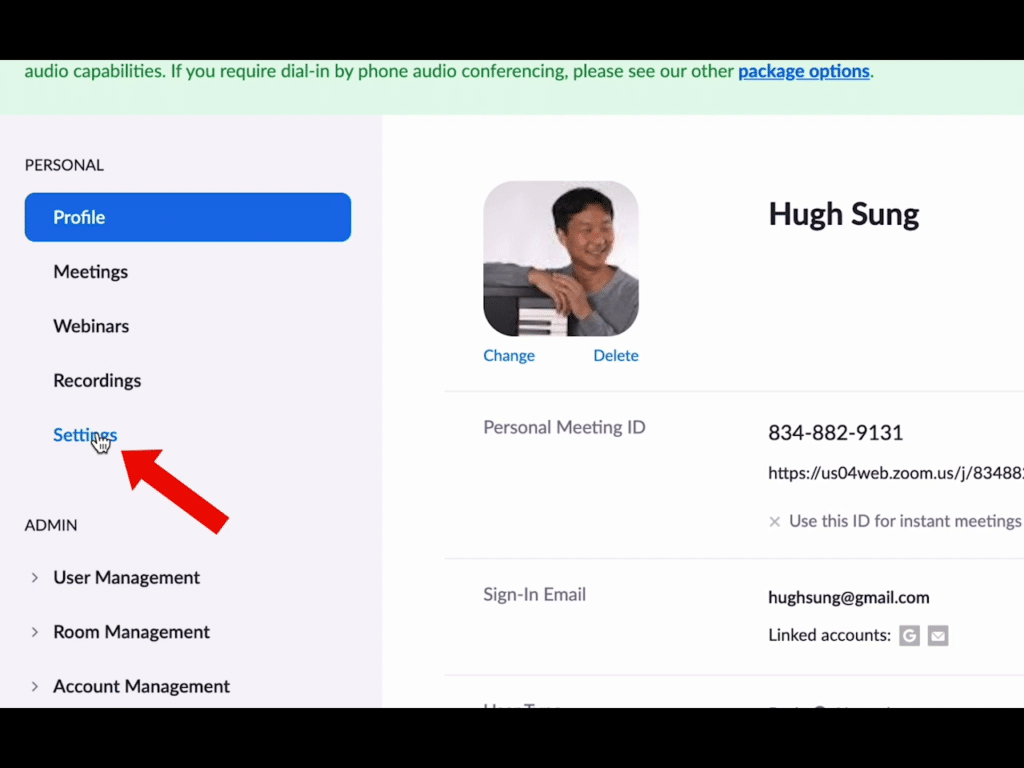
In this video, I’m using a popular app called Zoom, which has some advanced audio features that will help make the piano sound much better right off the bat by turning off the audio adjustment settings and preserving the original sound as captured by your microphone. Keep in mind that these adjustments can only be made with laptop or desktop computers running Zoom – I’ve tried finding the same features with mobile tablets and smartphones, but to no avail, so if you and your student want the best sound quality, you’ll have to stay with laptops and desktop computers for the time being (until Zoom adds those features to mobile platforms in the future). On your laptop/desktop computer, use your browser to log in to your Zoom account at https://zoom.us

After logging in, go into “Settings”
Then click on “In Meeting (Advanced)”

Scroll down until you get to “Allow users to select stereo audio in their client settings” and “Allow users to select original sound in their client settings”. Make sure these are turned on – the second option is the most important (“original sound”) – the stereo option is nice, but not mandatory (and it might add more information to send back and forth, resulting in possible delays and performance issues with the streaming video session).

On your laptop/desktop computer, open the Zoom app, and look for the icon of a microphone on the bottom menu bar. Click on the arrow next to it to bring up another menu.

Click on “Audio Settings…”

In the popup window, make sure “Automatically adjust microphone volume” is unchecked.
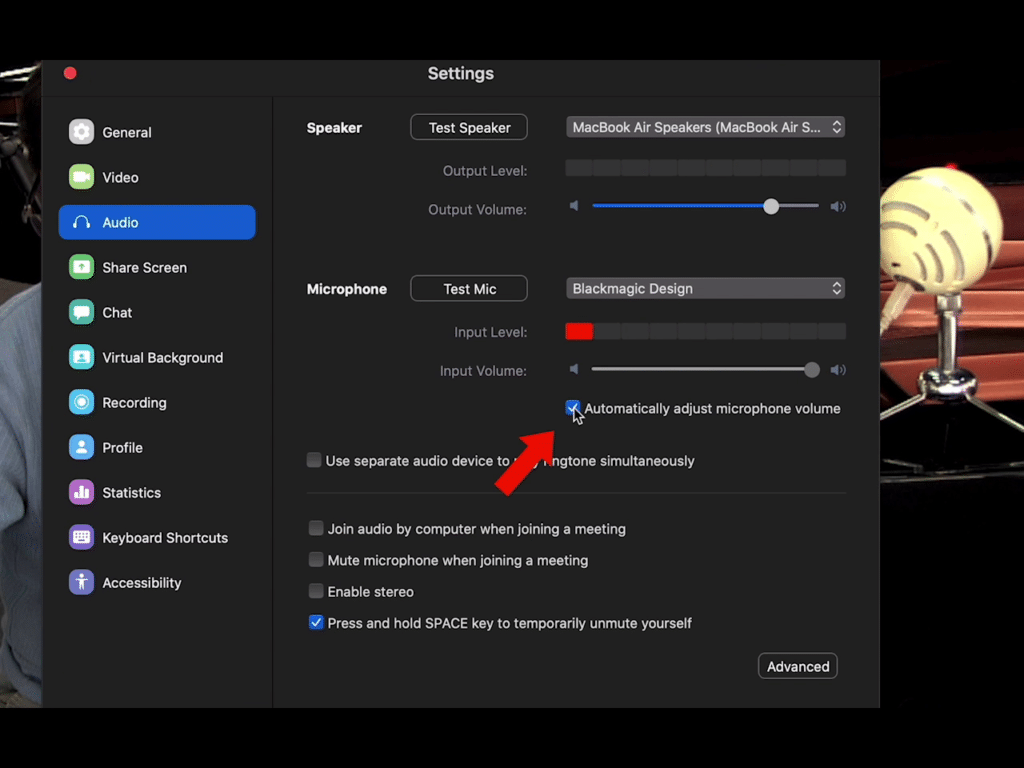

Optionally, you can also check the “Enable stereo” box if you want this feature.

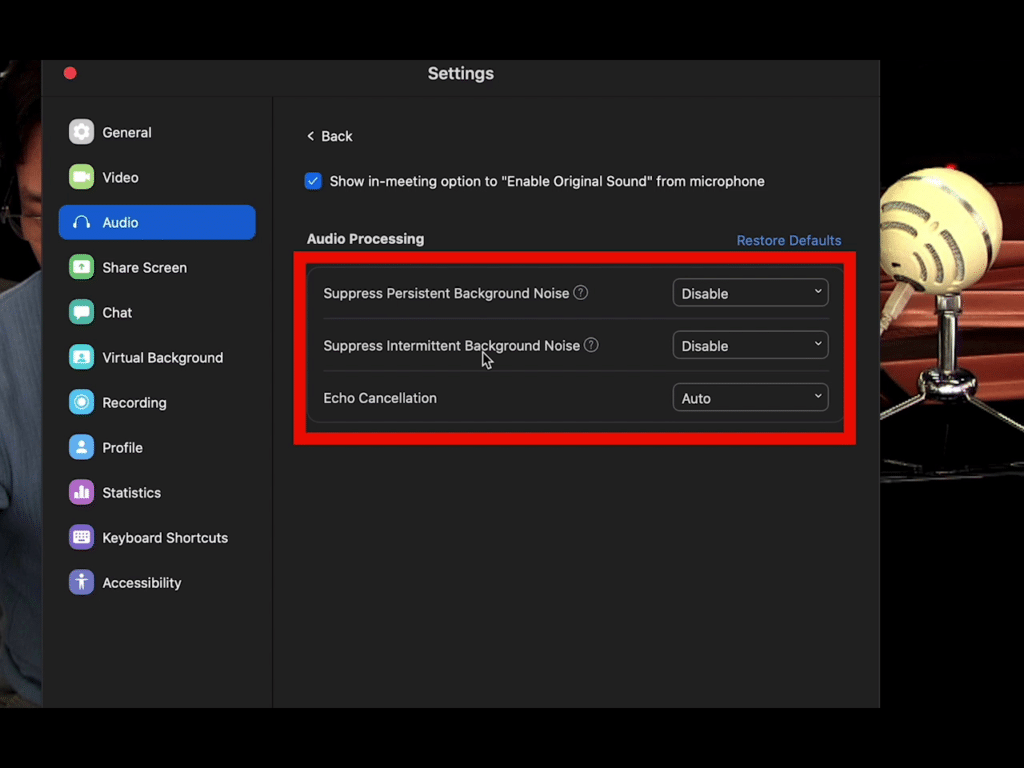
Next, click on “Advanced”.

In the next popup window, make sure “Suppress Persistent Background Noise” and “Suppress Intermittent Background Noise” are both set to “Disable”. Leave “Echo Cancellation” on “Auto”.
If everything is set up correctly, you should see a new option on the upper left corner of your Zoom app screen that allows you to “Turn on/off Original Sound”. Click this to activate original sound (the button will read “Turn off Original Sound” when active).

Note: you will need to make sure this is turned on every time you switch video or microphone devices within Zoom.
Microphone Comparison
My personal setup includes an Audix SCX25A, a fantastic condenser microphone for the piano, as well as a DPA lavalier microphone for my voice. Just these microphones alone cost around $1.6 – 2K for the set. While this might be justifiable for a professional musician, it might be difficult to ask a student to invest in microphones of this quality and price level for online lessons. For comparison, we begin by listening to the sound quality of these microphones as a baseline in our budget microphone comparison. I purposely play a soft musical selection for each microphone, which is the most difficult kind of music to convey through streaming video accurately.
07:01> - Music
08:49>
MacBook Air
This is the sound of a Zoom video using just a MacBook Air’s internal microphone.
- 09:36>
- Music 10:26>
You will notice a significant amount of room echo and background hiss. This is probably what a lot of teachers are referring to when they say that teaching online sounds like the piano is underwater!
Audio Technica AT2020 USB Microphone
The Audio Technica AT2020 USB Microphone is the most expensive budget microphone that I am testing, at around $120-150. While it does a good job of eliminating background noise and echo, it is also the softest of the microphones I tested.

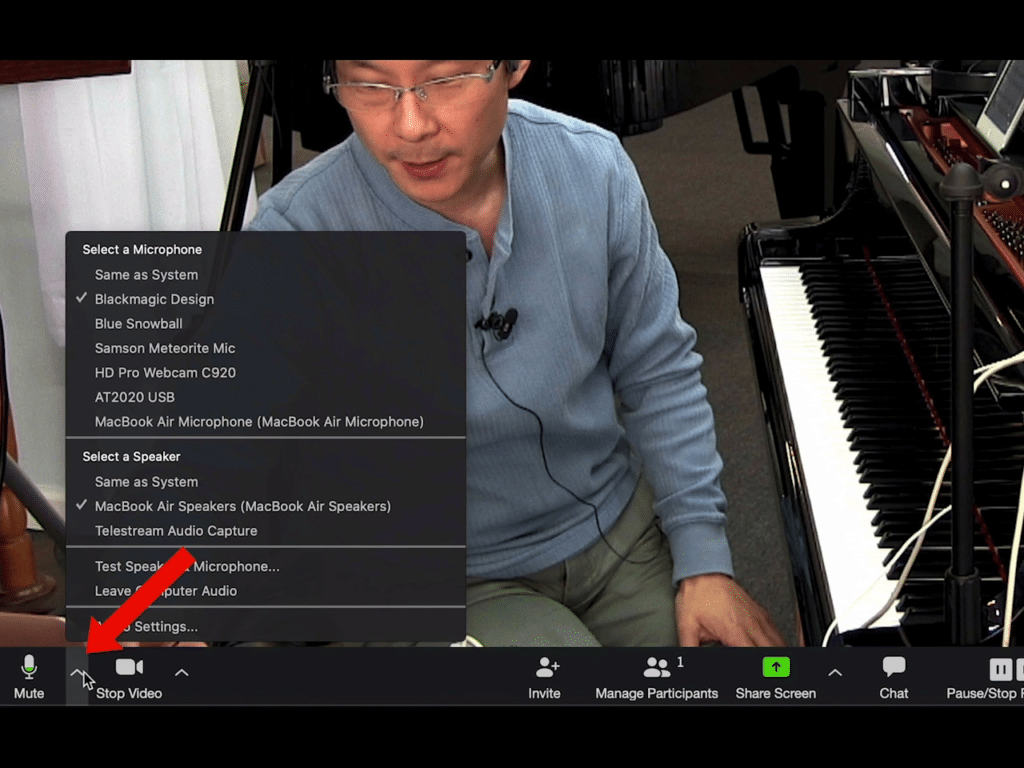
To switch between microphones and other audio devices within Zoom, go to the app and click on the arrow next to the microphone icon on the bottom tool bar. A menu will pop up, and you will be able to select between your available microphones.
- 13:24>
- Music 13:36>
Blue Snowball USB Microphone
The Blue Snowball USB microphone has been around for many years and is very popular. In fact, I’ve owned my own Blue Snowball for almost 10 years!

One nice feature is the fact that you can adjust the sound settings with a 3 way switch in the back.
- Position 1 will mainly record the sound in front of the microphone and minimize the sound behind it (good for minimizing ambient room noise).
- Position 2 will record mainly what is in front, but also include more background sound.
- Position 3 will record everything around the microphone, in front and behind. We call this “omnidirectional”.
Note that when I made this video, my Blue Snowball was set to position 1, and pointed mainly towards the piano.
- 15:21>
- Music 15:31>
The Blue Snowball USB microphone is priced around $50-70.
Samson Meteorite
The Samson Meteorite is one of the cheapest USB microphone I’ve been able to find so far, coming in at around $30-40. While cute and inexpensive, the USB cable is rather short. You may need to get a USB extension cable if you decide to use this microphone and need to have your laptop computer placed further away from the piano for a better camera view of the keyboard.

- 17:12>
- Music 17:28>
BOYA Dual Lavalier Microphone
The BOYA Dual Lavalier Microhone is an interesting microphone option that I came across while vlogging (video blogging) for my personal website at https://hughsung.com. I’m a big fan of BOYA’s lavalier microphone, which comes with a very long cable that connects to either my smartphone or my DSLR mirrorless Canon M50 camera, and is great for capturing my voice whenever I’m traveling or making foodie videos. When I saw that BOYA made a dual lavalier version, I got it with the intention of doing more video interviews, but then I thought that this might be a great budget option for online piano lessons. It costs around $40, but you’re getting essentially two microphones at that price, with cables long enough to place one by the piano and the other clipped to your shirt for your voice. The key to a good audio sound is being able to isolate all the sound sources from the surrounding environment – this BOYA provides a nice all-in-one option to be able to do just that.

The BOYA connects to the headphone/microphone port on your computer (or smartphone or tablet).

If your mobile device doesn’t have a headphone jack, you can get an adapter (most likely a USB C to headphone jack adapter).

If you decide to use headphones while teaching online (a good idea, as this will help to cut down on additional noise bleeding into your streaming video), you will need to get a headphone jack splitter that includes a microphone input. 20:40> You will notice that the BOYA is noticeably louder than the other USB microphones. At the time of the recording, I didn’t think to adjust the microphone input volume in my computer’s sound settings – that might help make this microphone sound better if you decide to use this for your online piano lessons. Music 21:44>
Multi-Camera Options
In my previous video, I discussed using webcams for multiple views of your piano. One of the webcams I’ve used is the Logitech C920 – I really like how compact it is for overhead views, but it’s not cheap (at least $100 – I’ve seen some listings close to $200 for similar webcams of this quality). Fortunately, within Zoom, there is a neat workaround to add extra “cameras” into your streaming lesson. If you own a smartphone, you can simply send yourself an invitation as an email. Use your smartphone to open the email and click the link to join the Zoom meeting (be sure to turn your smartphone camera on within its Zoom app). You can switch between your main camera view and your smartphone view by “pinning” each as a meeting participant.


You can also share your computer screen within Zoom by accessing the “Share” icon on the bottom toolbar. The Share tool also gives you a virtual whiteboard that can be shared with all participants.


If you happen to have an iPad, you can use the same smartphone email technique to share your digital sheet music and annotations. Note that you can’t reuse a previously sent email invitation – you need to issue a new one for additional devices to be added to the video session. After you’ve joined your Zoom session with your iPad, tap the middle of the screen to bring up the toolbars. On the top, tap on the “Share” icon that looks like a green box with an arrow pointing up. That will open a new menu with various app sharing options. Choose the “screen” option and you will be shown a dialogue to start a screen recording session. Start this to show whatever is displayed on your iPad screen to the Zoom session, and proceed to open your favorite sheet music reader app. Whatever you see or annotate on your iPad will now be seen by all the participants in your Zoom session.


If both you and your student have iPads, I recommend that you explore the sheet music reader app Newzik – this French-developed app was designed from the ground up to be a collaborative tool between large groups of musicians (orchestras, opera houses, etc.). One of the best tools is their Projects option, which lets you share sheet music with your students. Whatever you annotate on your music can be instantly synchronized with your student’s copy of the music, and vice versa. This way you don’t need to set up an extra “camera” view for your iPad and can set up more dynamic exercises with connected iPads (have students circle correct notes, draw note names, etc. and you can check their work and correct instantly, just as if you were looking over their shoulder with paper sheet music in person).

Equipment Links
- Audio Technica AT2020 USB Microphone: https://amzn.to/2RgkB4B
- Blue Snowball USB Microphone: https://amzn.to/2UOr60V
- Samson Meteorite USB Microphone: https://amzn.to/3dRVkrf
- USB extension cable (9′): https://amzn.to/39OX1lU
- BOYA Dual Lavalier microphone: https://amzn.to/2yDG8xN
- USB C headphone adapter: https://amzn.to/39MXuoO
- Headphone/microphone splitter: https://amzn.to/2JEE5LV
- Logitech C920 HD Webcam: https://amzn.to/2Xc7Rj7
- 4-port USB hub/extender: https://amzn.to/3bTcdQl